Titbits of Video Recording
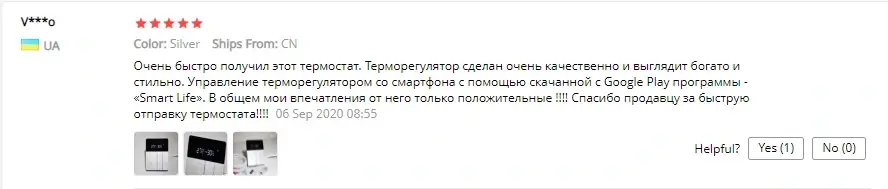
In mid-August 2020, a customer in Ukraine planned to buy a thermostat from us. This is a versatile user. He is a programmer and is familiar with all kinds of electronic products. In addition, he is also a YouTube channel owner and is good at making all kinds of videos. Professional technical knowledge, coupled with his excellent video production level, has allowed his channel to have nearly 10 million views. We gladly accepted his purchase request and sold it to him at a price of $0.01, with free shipping.

The order quickly completed the process operation, and we also quickly completed the shipment on the same day.
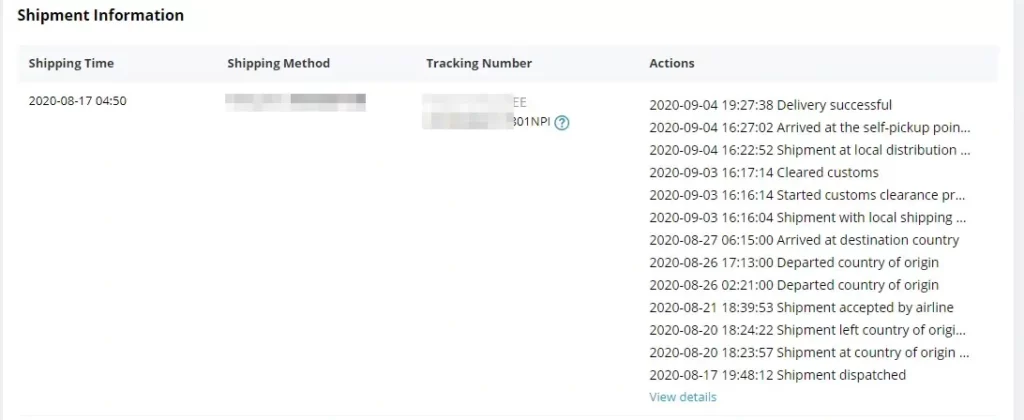
This is a transaction that both parties are very satisfied with. We are happy to provide the WiFi thermostat to the professional customer, and the customer is also very satisfied with the product in terms of function and quality. The entire cross-border transaction process just took 16 days, from placing the order to receiving the goods. Isn’t it very efficient?
Soon we received a good review from this customer!
But, surprisingly, this customer also specially recorded a usage video for us. So, we share this video here, hoping that it is helpful for Ukrainian users.
This is a rough summary of the video content.
the Overview of the WiFi Thermostat
The beginning of the video gives an overall overview of the thermostat, including the display of the APP interface and buttons, and introduces the appearance of the thermostat’s piano keys, the horizontal LCD screen, and the wiring methods (including the boiler, electric floor heating, water heating, external sensor wiring method).
This is a very nice display, which fully reflects the texture of the thermostat.
Install the Thermostat APP
Searching for the thermostat APP named “Smart Life” from Google Play or Apple Store, download and install it. Open the thermostat APP, click the “Add Device” button in the upper right corner of smartphone screen, find the thermostat, select and add. In the environment of 2.4GHz network, add the router, input the router password and complete the router configuration. At this time, the APP page will jump to the device access page. Connecting the power to the thermostat, press and hold the “M” key for 5 seconds to start the thermostat, and press the “-” key for 3 seconds to start the WiFi connection mode of the thermostat(a WiFi signal will flash in the screen). Return to the APP interface and click confirm the connection. The thermostat, router and thermostat APP will automatically pair. As long as the progress bar is 100% complete, the WiFi function of the thermostat is set. The WiFi icon will appear in the upper right corner of the thermostat screen.
Here, We have completed the WiFi configuration in this way. Next, we start to operate the thermostat on the APP.
Remotely Control the Thermostat on the Smartphone APP
On the APP home page, you can see the information on connected devices. Select the corresponding device, and click the switch button, you can control the thermostat switch wirelessly.
Click the thermostat to enter the complete device operation interface, including the current room temperature, set temperature, and temperature increase/decrease buttons.
Click the setting button to enter the sensor setting options, temperature calibration options, temperature compensation options, and programming mode.
Find the sensor setting option, and the user can adjust the sensor selection of the thermostat, including the built-in sensor, external sensor, internal and external sensors.
In the programming mode, the thermostat APP provides 5 + 1 + 1 (Monday to Friday, Saturday, Sunday), 4 periods of setting options, the user can set the temperature and the corresponding start time respectively.
In the menu options on the APP interface, you can adjust the mode of the thermostat, including four modes: HOME, AWAY, SMART and SLEEP. After selecting the mode, the corresponding mode icon will appear on the screen of the thermostat.
Click the upper right corner of the APP interface to enter the access interface of Alexa, Google assistant and Tmall Genie.
the Packing List of the WiFi Thermostat
Usually, the thermostat packaging includes packing box*1, thermostat*1, and fixing screw*2. If customers buy the electric floor heating thermostat, there will be an extra external sensor.
Features of the Thermostat
the Thermostat Has a Power-off Protection Function
After you set the target temperature or configuration options, the home suddenly runs out of power, will it cause the parameters that have been set to be lost? No, the thermostat will automatically restore the configuration before the power failure after the power supply is restored.
the Overall Thermostat Is Very Textured
The unique piano keys and the negative display effect of the LCD screen make it impossible to be more perfect!
the Thermostat Is Also Very Simple to Install
Users can easily twist the back cover mounting plate, install it into the junction box, and then easily install it into the wall of the home.
The general content of the video is like the above. We are not going to describe more details. Let’s enjoy it directly.
🙂